photography notes
Photographing Radioactivity with a Webcam
by T.J. NelsonOverview
Modifying a webcam is an inexpensive way to gain experience with CMOS imaging chips. Besides being cheaper than digital single-lens reflex cameras, webcams are more sensitive to ultraviolet (UV) light. Since the imaging chip is easily accessible, webcams can also be used to detect radioactivity.
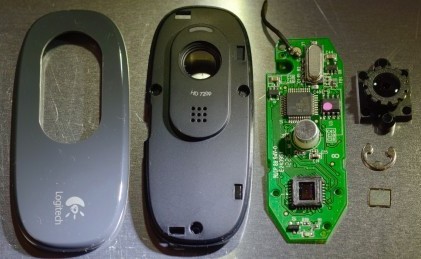
Logitech C270, interrupted.
The filter is the small rectangle at the lower right.
 had little success last month detecting
radioactivity with my Nikon D90, but I found that a Logitech C270 webcam easily
picked up alpha particles and beta particles from a variety of natural and artificial
sources. I was hoping to use this webcam in the lab to monitor radioactivity, but its
sensitivity was too low, mainly because of the small sensor. Even so, it's an
interesting way to gain insight into the different types of radioactivity.
Although a webcam can detect high-energy particles without modification, it's necessary to modify it by removing the glass protective filter on the sensor to get maximum efficiency for low-energy particles such as alphas. Removing the filter also makes the webcam sensitive to infrared and ultraviolet light. In some older webcams, the filter and the protective glass over the sensor were separate, which made modifying them for infrared easy. In the C270, they are combined, which makes it more difficult. But ... it's not impossible.
Modifying the Logitech C270 Webcam
The filter we want to get rid of is a IR/UV reflective dichroic coating on the glass that protects the CMOS sensor chip. The glass is also faintly blue, which helps the camera produce a realistic color balance. The filter is not as strict as the IR/UV blocking filters in most DSLRs, but in the C270 it is glued (or, more likely, sonically welded) on the front of the sensor and protects it from dust and humidity. Removing the filter without destroying the chip is somewhat difficult.
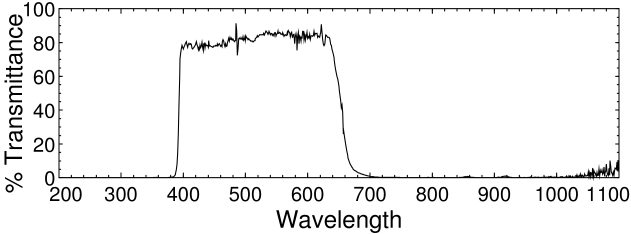
Logitech C270 filter spectrum.
The lens is most likely acrylic or polycarbonate, which means if you want to photograph UV you will have to replace it with a glass or quartz lens. For infrared, the lens should be just fine. For radioactivity, the lens is not used.
Here is the procedure. Refer to the photo above. Try at your own risk. My success rate was only 50%.
- Pry off the front bezel and remove the three screws holding the plastic case together. This camera is extremely sensitive to static discharge. Avoid touching the metal parts as much as possible and wear a grounding strap.
- Unscrew the two screws in the circuit board, and pull out the circuit board. Remove the retaining ring from the cable and trim the rubber grommet to free the board.
- Use a soldering iron to remove the green LED. Otherwise, light from the LED will create a bright glare in your images.
- Remove the lens assembly. The black lens assembly is held in place by two screws on the back of the circuit board. The lens itself can be unscrewed, but this is not necessary.
- The filter is the iridescent red/green piece of glass glued onto the black PVC sensor casing. If you break the glass, small pieces will get on the chip and destroy it. Grinding the plastic with a Dremel or even a Proxxon IB/E will only create vibrations that will destroy the sensor. The only safe way to remove it is to pry it out. This has to be done under a dissecting scope or a strong magnifying glass. PROTECTIVE GOGGLES ARE ESSENTIAL!
- Using a fresh single-edge razor blade, carefully make vertical grooves on all four sides of the filter. Angle the grooves a few degrees in, so you undercut the filter. Avoid pressure, which will crack the glass. Remove any dirt or plastic pieces using a piece of masking tape.
- Very slowly insert a jewelers screwdriver under the filter and pry it up slightly on all four sides, just until it separates from the plastic. If the glass cracks, it will make your task more difficult. Once it is free on all four sides, turn the board upside down to prevent particles from landing on the chip, and remove the glass with a pair of forceps.
- For UV photography, attach a 0.5 mm thick quartz window to the back of the part with the round hole (second piece from left in photo above) over the sensor with hot-melt glue. If you are only interested in infrared, this is unnecessary and you can use glass or simply re-attach the original plastic lens. For UV, you will also need a glass or quartz (fused silica) lens. For radioactivity, leave the sensor exposed.
Infrared Photography With a Modified Webcam

Infrared photograph from modified webcam (Hoya R72 filter; resized and channel-swapped).
The modified webcam was highly sensitive in the infrared, although it's hard to be specific because of its auto-exposure feature. In the photo at right, the webcam was attached to an 80-mm Nikon lens with masking tape. Because of the small sensor, this produced a huge telephoto effect, and it was necessary to point it at a pine tree a few hundred meters away. Re-attaching the original lens would probably have worked better, but it would probably be necessary to re-focus it. This is easy because the plastic lens screws in and out. Note that if any dirt falls on the sensor, it's there for good, as there is no way to clean the bare chip.
It was also possible to take photographs in ultraviolet, but here, the results were, uh, not so good.
Photographing Radioactivity
Place a radioactive source near the sensor and take a movie at the camera's
highest resolution setting. The room must be completely dark.
Use ffmpeg to extract the frames. For example, this
command tells the software the frame rate is 30 fps and extracts the first
two seconds into png files:
ffmpeg -i video21.wmv -r 30 -t 2 -f image2 img-%04d.png
Ffmpeg for Windows is similar. To use it, open a DOS box by running cmd.exe
and type the command. Put the movie file in its own folder first.
In the images below, I used the Linux program Imal to subtract the background and add the desired number of frames together to create a virtual time exposure. The images are shown full size, but cropped.
Images of Radioactivity
Americium-241. 241Am from a smoke detector produced large numbers of alpha particles, which appeared as large round dots. Alpha particles are helium nuclei, which means they are very massive in comparison to other types of radioactive particles. The huge size of their track is consistent with the rule of thumb that alphas are 20 times more harmful than betas or gammas. Luckily, they aren't penetrating and are stopped by a piece of paper or plastic wrap. Only a few alpha particles were detected unless the glass filter was removed.
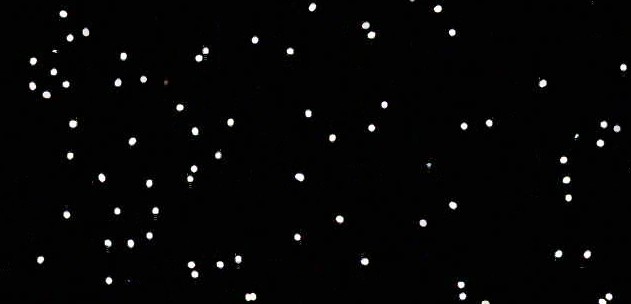
Single frame (1/30 sec) of a sample of americium-241 showing pure alpha particles
Alpha decay occurs by quantum tunneling. This is the main reason why the rate of α-decay depends critically on the energy Eα of the α-particle. A 2.5-fold change in Eα changes the half-life of an α-emitter by 20 orders of magnitude [1].
Phosphorus-32. 32P, which we use in the lab in our experiments, appeared as small dots and long streaks, many of which were faintly colored as the beta particle struck the red, green, or blue pixels. If the color saturation of the image below is increased, it bears a striking resemblance to some of the lesser-known works of Jackson Pollock. (The image above is also very faintly colored).
Unlike the massive alphas, beta particles (which are fast-moving electrons) are bounced around into curved paths as they strike the silicon atoms in the sensor. Also, unlike photons from light, which only release (at most) a single electron each, a single radioactive particle can dislodge thousands of electrons.
The amount of radioactivity in the sample imaged below was quite high: our Geiger counter, which was calibrated to have 19.2% efficiency, was saturated at 70 mR/hr, or 200,000 counts per minute, when placed next to this sample. The webcam showed a lot less than that, indicating that its efficiency was very low. This is mainly because the sensor has much less area than our Geiger counter probe (0.2 vs. 19.6 sq.cm).
This amount of radioactivity is higher than the 1 μCi an individual is allowed to possess, and this demonstration has to be done by an individual with appropriate safety training, and in a facility that has a license from the NRC or the state. Both of those conditions were met here.
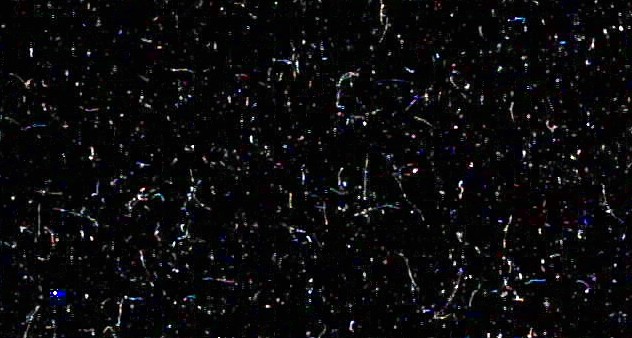
Combined frames (2 sec) of a sample of phosphorus-32 showing pure beta particles. The tracks have subtle colors due to the particles striking red, green, or blue pixels. This picture is titled "P32 number 20."
Uranium-238. Autunite (Ca(UO2)2(PO4)2.10-12H2O) and meta-torbernite, the copper-containing form, are naturally occurring radioactive minerals, and produced combinations of large round dots and long tracks, as shown in the photos below. The large round dots were only seen when the glass window was removed, indicating that they are alpha particles, while the long tracks are betas. However, the tracks are longer than the P-32 tracks above, indicating a higher energy.
Torbernite is hard to come by in rock shops these days, but back when we were a free country it was commonly available and sold to mineral collectors, and it was highly valued because of its strong green fluorescence under ultraviolet light. (Before anyone thinks of calling out the guys in white Tyvek, the amount of radioactive material here is about 0.0005 microcuries, the same as from the natural potassium in two bananas.)
A sample of depleted uranium was the same, but with even fewer particles. Because of its long half life (4.5 billion years), only a small number of uranium atoms will disintegrate at any given time. Thus, one gram of a fresh sample of pure uranium will only emit 8,900 alpha particles per second, or about the same as that produced by the potassium in 174 bananas. Depleted uranium has much less than this.
It should be noted that in New York City under Michael Bloomberg you may soon get in trouble for buying this many bananas. But they will have to pry my banana from my cold, dead hands .... Hmm, that didn't quite come out right.
Some of the radiation from the samples here is probably from its shorter half-life decay products, which include thorium-234, polonium-218, and bismuth-210. As it decays, U-238 is sequentially transmuted into 15 different isotopes of eight different elements. Along the way each atom releases a total of 8 alphas, 6 betas, and 9 gammas. It becomes bismuth twice and polonium three times before finally ending up, billions of years later, as stable lead-206. Because of its complex decay chain, uranium actually appears to become more radioactive over time. However, we are not talking weeks or months, but billions of years here.
U-235, which I don't have a sample of, produces a total of 7 alphas and 4 betas. An alternate decay pathway for this isotope consists of fission, which releases neutrons (on average, 2.5 neutrons per fission event). U-235 ends up as lead-207: a slightly heavier stable product than normal uranium.
In contrast, U-238 requires high-energy neutrons to induce fission. Many people don't realize, though, that U-238 can also undergo spontaneous fission like U-235. The process is extremely rare, with a half-life 531,000 times longer than the age of the universe. Almost all the activity from U-238 comes from emission of alpha particles, which as mentioned above has a half-life of 4.5×10⁹ years.
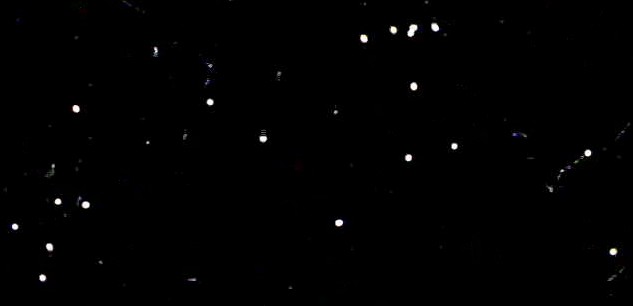
Combined frames (2 sec) of a sample of autunite (Ca(UO2)2(PO4)2.10-12H2O) showing mostly alpha particles
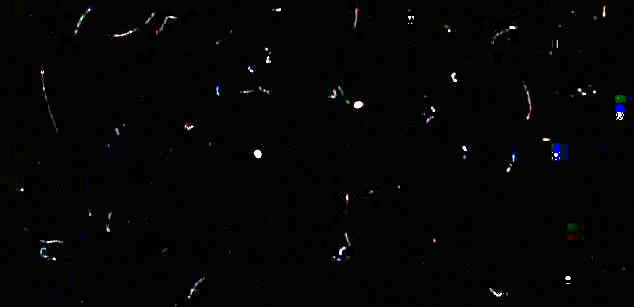
Combined frames (2 sec) of a sample of autunite (Ca(UO2)2(PO4)2.10-12H2O) with most alphas blocked by saran wrap showing alpha and beta particles
Potassium-40. About 0.0117% of the potassium in a banana consists of 40K, which emits gamma rays of about 1.461 MeV, as well as some betas. Gamma rays are hard to detect with a Geiger counter, and the ability to detect gammas would be very convenient in the lab. The fact that bananas are also fluorescent made this experiment a top priority.
Combined frames (120 sec) of a sample of potassium chloride ("light salt") from the grocery store
The signal of 40K from so-called "light salt" (potassium chloride) was 400 cpm, well above the 15 cpm for background in a Geiger counter. In the lab, using a scintillation counter, I measured 928 counts per minute in just one gram of it—a level that would get us in big trouble if we spilled it there—but only a few frames showed any signal in the webcam, and the tracks were much shorter than the uranium tracks. The problem is not just lower particle energy; its low abundance means the disintegrations are spread over a much bigger area (in this case, my kitchen table) so they are farther away from the sensor, giving the webcam a very low counting efficiency. As for the bananas, they were delicious. Oh, whoops.
As an aside, the above reference about bananas being fluorescent says it was a big discovery because no one ever noticed it before. In fact, many types of food are fluorescent. Wait until they find out about green peppers.
Cosmic Rays. Photographing cosmic rays is tricky because they resemble hot pixels, only bigger, so it's necessary to compare at least two images side by side. If the spot appears and then disappears, it's probably a cosmic ray. To photograph them, take the camera outside, remove the lens, and cover the opening with black paper. There are more cosmic rays when the Sun is quiet, because the Earth's magnetosphere repels them, so now (2013) is a good time to study cosmic rays.

Photograph of an unusually energetic cosmic ray taken with a regular camera. The same region of the sensor a few moments earlier is shown at right.
Cosmic rays that reach the surface are usually protons or nuclei of heavier elements. They can lose energy as they travel through the atmosphere so they often resemble alpha particles when photographed. Beta particles from space cannot penetrate the atmosphere, but high energy cosmic rays produce showers of smaller particles including electrons and muons. Photographs of ionized particles taken in space look more like beta particles, because satellites in space are mainly observing the solar wind, which is composed of protons and electrons from the Sun.
Conclusion
The alpha particles were very bad for the sensor. After only a few minutes, there were 26 stuck or dead pixels. The efficiency of a webcam is also much lower than that of a standard Geiger counter with a pancake probe, mainly because of the smaller area. With the protective glass removed, a webcam is also more fragile than a Geiger counter. It requires a computer and is rapidly degraded by radiation, which means it would be hard to calibrate. So webcams won't be replacing our radiation meters anytime soon.
Sample Movies
Update (Oct 22, 2014) Below are some 5-second movies made by the webcam in WMV format. They can be played by mplayer in Linux or Windows Media Player in Windows.
Americium-241
Looks very active because the alpha particles give a large round track.
However, alpha emitters are not a hazard unless ingested—and smoke
detectors are very difficult to swallow.
Phosphorus-32
A moderate quantity of P-32 (about 0.25 mCi) photographed in a licensed
laboratory by a trained person. This quantity is usually handled behind
an acrylic shield, and the user is required to take special precautions
when using it. P-32 emits beta particles which show up as long fine
tracks.
Uranium-238
A mineral specimen containing very small amounts of natural U-238. A combination
of alphas and betas.
Depleted Uranium
About 100 mg of powder. This shows that depleted uranium actually contains
very little radioactivity. A fair number of stuck pixels are evident.
Lab workers are always surprised to discover that Radiation Safety doesn't
consider this material to be sufficiently radioactive to be worth inventorying.
References
[1]. B.R. Martin, Nuclear and Particle Physics, 2nd ed p.235
