|
photography notes
Modifying a Nikon D90 DSLR for Infrared Photography and AstrophotographyModifying a DSLR camera for near-infrared.by T. J. Nelson |

|
photography notes
Modifying a Nikon D90 DSLR for Infrared Photography and AstrophotographyModifying a DSLR camera for near-infrared.by T. J. Nelson |
Many people have modified their Canon DSLR cameras to improve the sensitivity to near-infrared light. This has led to the perception that Canons are preferable to Nikons for astrophotography and infrared photography. This page demonstrates that it is just as easy (if not easier) to modify a Nikon, and the results are just as good. In fact, Nikon's infrared cut-off filter, which passes all the important emission lines, makes the D90 almost ideal for astrophotography. Clearly Nikon is aware of this market and has designed their optics accordingly. I am using a D90, but it's likely that other Nikons are built similarly and will work just as well.
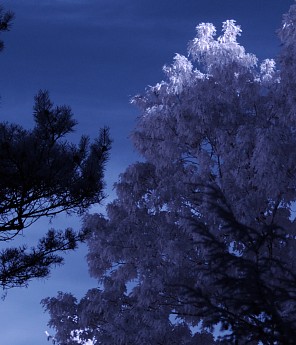 Infrared photo of trees
(Modified D90, R72, Nikkor VR 18-300 f/3.5-5.6G, 86mm, f/8, 1/160 sec, ISO 200;
R and B channels swapped)
 strophotographers face a big problem when photographing objects like
the North America Nebula that emit their light in the near infrared. In a CCD
camera, the nebula appears dark red because of the red H-alpha (Hα)
glow at 656.281 nanometers caused by radiative recombination of hydrogen.
However, the human eye, and most DSLR cameras, can barely detect this
wavelength, so the nebula appears pink or reddish-gray, more like a
smudge of dirt, as in the example shown below.
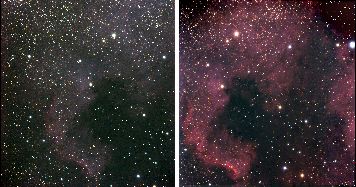 North America Nebula photographed with an unmodified D90 (left) and with a
modified D90 (right). Exposure times: left=104 min, right=47 min.
The D90 and the more recent Nikons (as well as Canons) are among the worst offenders because of their strict infrared-blocking filters. However, all DSLRs suffer from this effect to some degree. Luckily, it's possible to remove the infrared-blocking filter from the D90 and similar cameras without damaging it. If you later decide you don't want infrared, you can simply re-install it.
The basic steps are very straightforward. Nikons are very well made, and the parts can be reassembled easily without forcing them. When I first took apart my D90, I was greatly impressed by the workmanship—the screw holes all line up perfectly, and the workings are very well designed. The steps below took me a couple of hours. If you're experienced, you can probably do it even faster. There are commercial vendors who will do this for a reasonable fee. I highly recommend them if you have shaky hands.
Disclaimer #1: I have had years of experience repairing small electronic and optical devices and computers. I have taken apart my D90 several times and repaired the electronic stuff, so this is all familiar for me. If you bend any of the parts, pull on the wires, or touch any electronic stuff without being properly grounded, you could easily do serious damage to your camera. Please don't blame me if this happens.
Disclaimer #2: I only use manual focusing on this camera, partly because it's faster, and partly because the autofocus on my D90 never seemed to work very well. If you change the thickness of the glass in the light path, or misalign the sensor, it could put the autofocus out of calibration. This means that unless you replace the IR filter with a piece of glass of the same thickness, you will have to use Live View to autofocus from then on. (Live View is the only way you can frame a picture when an infrared filter is on the camera, because the view through the viewfinder appears black.) For astrophotography, of course, autofocus is never used.
Do not try this procedure unless you have the appropriate background and experience. If you can't bear to risk screwing up your camera, leave it to an expert. My camera was already pretty beat up when I started, so breaking it wouldn't have been a catastrophe. It goes without saying that modifying your camera will void the warranty. Make certain not to touch any wires near the capacitor, which is used for the flash. If you do, you could fry the circuit board and get an electrical shock. The capacitor holds a charge even after the battery has been removed. Always wear goggles when disassembling anything, especially items that may contain springs or glass parts.
Enough nannying. Let's start ripping stuff apart!
The part we will remove is actually a sandwich, with an absorptive blue color-correction / IR-blocking filter (29.5×21.5×0.318 mm) cemented to a clear glass optical low-pass filter, also known as an antialiasing or blurring filter (29.5×25.0×0.737 mm). On top of this is another clear piece of glass (or quartz?) the same size and thickness as the blue CC filter. The total thickness is 1.374±0.002 mm. Typical refractive index for this type of glass is around 1.54-1.55 at 500 nm.
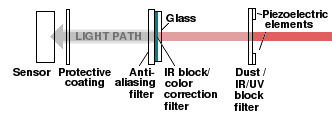
Optical low-pass filters (OLPFs) typically consist of a birefringent material such as quartz or lithium niobate that splits the light from one pixel into two pixels, much as a calcite crystal does. Often the OLPF is combined with an IR-blocking filter. There are two types of IR-blocking filters. One type uses a colored dye, and the other uses a dichroic coating on the surface that reflects the infrared back toward the lens. The D90 uses one of each.
A newer type of OLPF, used in Nikon's D800, contains three elements. In this type, a birefringent material in the first element splits the light into two beams, each with a different linear polarization. Both beams then pass through a wave plate that converts linearly polarized light to circularly-polarized light. A second low-pass filter then converts these two beams into four beams, so that the original light is now spread across four pixels. This arrangement allows the manufacturer to produce a specialized camera without the low pass filter, simply by eliminating the middle wave plate. Since the polarizations are no longer rotated, the second birefringent element simply recombines the two beams.
The replacement glass is a rectangular piece of glass that contains the blurring feature, but not the color correction. It's about half the size of a microscope slide that drops in to replace the filter. It's needed to keep the camera's focus in calibration, and also makes it easier to re-assemble the sensor. Without it, the camera will still work when attached to a telescope, but you will have difficulty focusing with a regular lens. I bought a replacement clear glass from a company called LifePixel. These little pieces of glass are fairly expensive.
Some people remove the blur filters and substitute an ordinary piece of glass to improve the resolution, contrast, and color detail of their cameras. With a little practice, it is easy to take AR-coated optical quality glass (from Edmund Optics or another vendor) and cut it to the proper size. (This would also improve the light throughput, as the originals do not appear to be coated.) A glass company or optician could probably do it for you for a couple of bucks. To maintain the focus calibration, the refractive index and thickness must be the same as whatever was removed. The only disadvantage of this is that you would lose the antialiasing feature. If you routinely take pictures of dazzling psychedelic black and white patterns, you might notice a slight increase in the moiré effect. On color cameras, the Bayer matrix can cause fine details to appear as extraneous colors if black/white transitions occur less than one pixel apart. This is not likely to occur in astrophotography unless you're at the top of a mountain in Chile with a 30-inch scope.
Almost all manufacturers of cameras with Bayer sensors deliberately blur the images to reduce aliasing, to prevent customer complaints. This deliberate blurring is one reason why dedicated monochrome CCD cameras give sharper images than DSLRs. Manufacturers try to compensate for the additional blurring by adding automatic sharpening in the camera's software. Astrophotographers usually turn this sharpening off because it creates rings around the stars. In effect, by including an antialiasing filter, manufacturers are trading one artifact for another.
Filtering does not really cure aliasing; it merely reduces it at a particular spatial frequency by removing that spatial frequency from the image. What filtering does is remove the false color, which only occurs at the spatial frequencies close to the size of the Bayer matrix. See http://maxmax.com/nikon_d200hr.htm for a discussion of the trade-offs.
Here is what you will need:
Some people use a UV/IR filter instead of clear glass. The idea is that some lenses can't focus the shorter ultraviolet or the longer near-infrared wavelengths to the same point as the visible wavelengths, which causes a slight blurring. A UV/IR filter is fine if you only plan to do astrophotography, but installing a filter would prevent you from doing infrared photography. The alternative is to install a UV/IR filter on your lens or scope itself.
On the D90, a IR-blocking lens filter is not necessary unless you also remove the second UV/IR filter, which is actually a coating on the dust filter (see below).
The microscope helps if your vision ain't so hot. Rule #1 in repairing cameras is: be sure you know how something is attached before you try to remove it. A microscope is a big help with this—and it's essential if you decide to do any soldering on the camera's circuit board. The parts in a Nikon should come out easily once the appropriate screws are removed. For a microscope, I used a cheap Made-in-China one that I bought for $300 to do electronic work, and re-engineered it until it actually worked.
There are two different modifications that can be done to a D90: partial infrared conversion and full infrared conversion. Here are the differences.
Infrared conversion of Nikon D90| Original D90 | Partial infrared conversion | Full Infrared conversion | |
|---|---|---|---|
| Wavelength range (nm) | 415-640 | 415-685 | 330-1000 |
| Filters removed | 0 | 1 | 2 |
| Reversible | Yes | Yes, with minor soldering | |
| Nebulas | Too Faint | Good | Good |
| Carbon stars | Too Faint | Some | Good |
| Infrared Movies | No | Outdoors only | Excellent |
| Usable for normal photography | Yes | Yes, after reset white balance | Yes, if you use a lens filter |
| Thermal infrared photography | No | No | No |
| Color infrared photography | No | Depends on filter | Depends on filter |
| Set white balance w/R72 filter on | No | No | Yes |
| Relative sensitivity at 700 nm | 0.003 | 0.07 | 1.0 |
| Relative sensitivity at 656 nm | 0.25 | 1.0 | 1.0 |
| Overall sensitivity | 1.0 | 1.1 | 3.0 |
The main difference between partial and full conversion is that full conversion gives you a big increase in overall sensitivity and in wavelength range. The trade-off of full conversion is that near-infrared tends to overwhelm the visible, so you need to put a UV/IR blocking filter and a blue color-correction filter on your lens in order to use it for regular photography. It's also advisable to re-set the white balance for both partial and full conversion. This is easy in the D90.
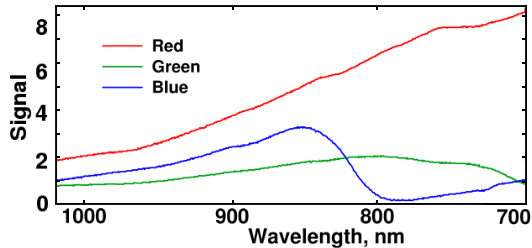
With a full conversion, it's possible to set the white balance even with an R72 infrared filter attached, because the blue pigment in the sensor transmits IR longer than 800 nanometers (see below). With partial conversion, it's hard to set the white balance in the camera with an IR filter attached, and the white balance can only be changed in the computer.
Both types of modification are easily reversible, provided that you save the filters, and avoid scratching them. However, the "dust removal" feature will be lost if you do a full conversion, and restoring it would require soldering the four wires back together. As described below, this is not really an issue, because the dust removal feature doesn't really work very well anyway.
"Color" infrared photography is done by allowing both visible and near-infrared light through. Infrared conversion per se does not affect the amount of visible light that reaches the camera's sensor, but it does affect the ratio of visible to infrared. To block the visible light, you use an IR-pass filter, most commonly an R72 or RM72. The shorter the wavelength cut-off of your IR-pass filter, the easier it will be to take infrared photos that still contain color. On the other hand, a longer wavelength cutoff filter such as an RM90 will make color infrared pictures almost impossible, and such images are usually presented as grayscale.
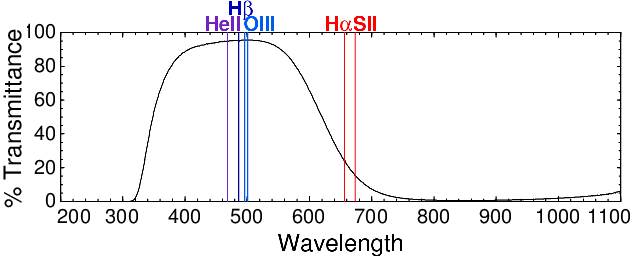
For partial infrared conversion, we remove only the blue color-correction filter, which lets us photograph some near-infrared. This is the ideal conversion for astrophotography, because it extends the sensitivity to just beyond the Hα wavelength. Below is the spectrum of the blue color-correction filter that is removed in a partial conversion.
For complete infrared conversion, we also remove the UV/IR blocking filter. This opens up the complete world of near-infrared photography of terrestrial objects, allowing normal exposure times for infrared photos and movies even in dim light. It also gives you the option of using the D90 for high-sensitivity near-infrared black & white astrophotography. Normal visible light color photography can still be done, provided you put a filter in the light path. Below is the spectrum of the UV/IR blocking filter that is removed in a full conversion.
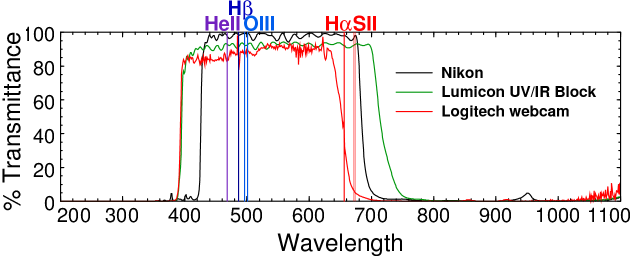
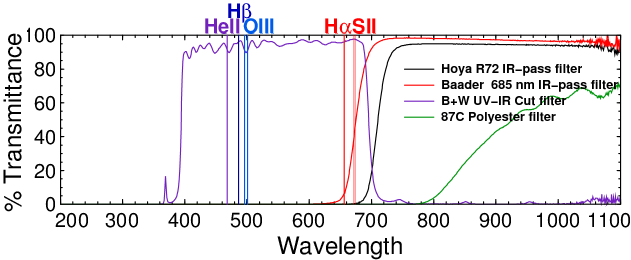
The spectra above explain why a partial infrared conversion gives you only modest sensitivity in the IR. Partial conversion only extends the wavelength to 685 nanometers, but for IR photography we put a filter on that blocks everything below 720. Only the small triangular area where the two curves overlap gets through both filters. The only reason we see anything at all is because the filters are not 100% efficient.
Here is the procedure for doing a partial infrared conversion. I won't give you the tedious screw-by-screw details, because they aren't necessary and they just interfere with a conceptual understanding of the process, which is all you need.
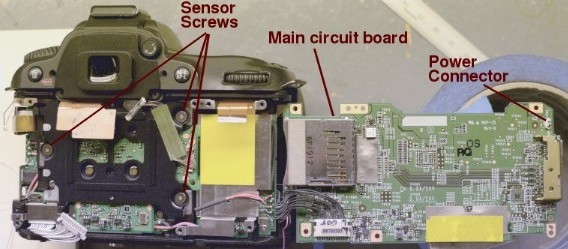
"Left" refers to the left of the camera looking at the back (the side with the LED screen). The CMOS sensor and filter are removed from the back of the camera, not the front as you might think. Unlike with some other cameras, there's no need to de-solder or break anything to remove the filter in a Nikon. There are no glued-on pieces to remove or break apart, and nothing that needs to be bent or pried off. There are no mechanical gears to worry about as in some cheaper cameras. Nothing is taped or glued down as it is in some Canons. So it's much easier and a lot less scary than modifying a Canon. But if it's your first time, dismantling your thousand-dollar camera will still be stressful. Take it slow and have someone mop your forehead from time to time. Those drops of sweat are murder on the electronics.
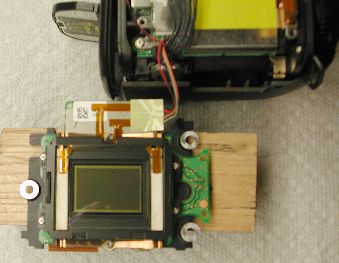
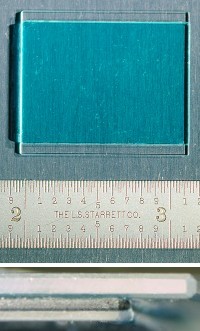
Below is a photo taken with a partially modified D90.
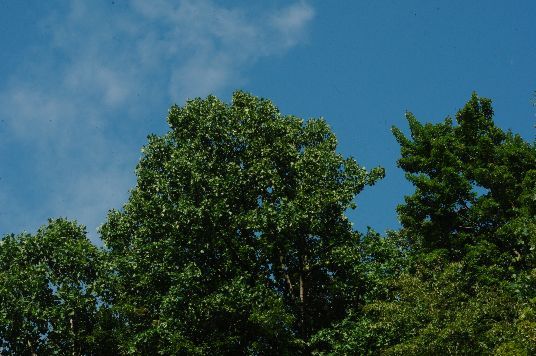
Next, follow the instructions in your manual to set your white balance to "Preset Manual". This involves pressing and holding the WB button and taking a picture of something white. You will need one custom white balance for each type of lighting you use (daylight, incandescent, or fluorescent). If you prefer, you can install a color-correction filter to your lens, which lets you use the camera's auto-white balance feature. If you can't find one specifically for Nikon, it doesn't matter—the spectra of the Nikon and Canon hot filters are very similar.
Below is a photo taken with a partially modified D90 after adjusting the white balance. The appearance is indistinguishable from other photos I took before modifying the camera. One nice thing about the D90 is that it's easy to switch between using it for infrared and for regular photography. Simply set the white balance and slap on an infrared filter. On a D90, you can save up to five different custom white balances. Of course, you can also change the white balance later in software.
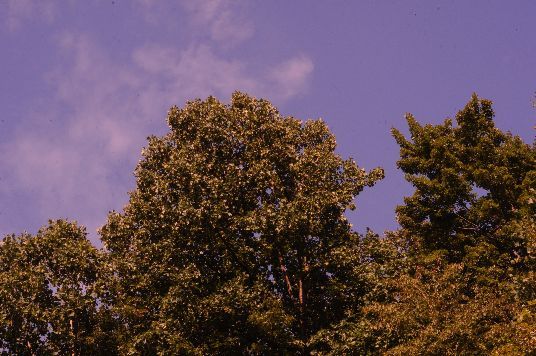
The white balance also has a big effect on how your infrared photos come out. Setting the white balance to "Preset Manual" just produces an ugly dark orange scene when an R72 infrared filter is used. When it's set to "Daylight", a Hoya R72 filter produces white trees and a black sky, as shown below. This is typical of an unprocessed infrared photograph.
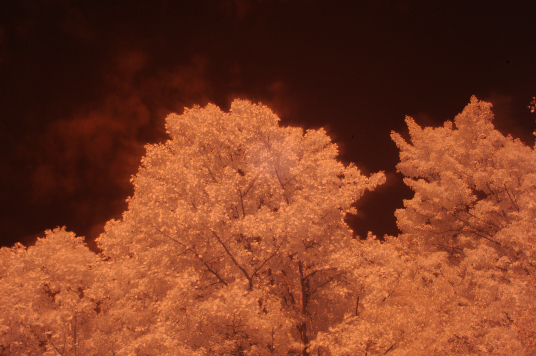
Obviously, you wouldn't leave your image red like this. There's a lot of art, skill, and Photoshoppery involved in making those beautiful infrared images you find elsewhere on the Internet. And you'll want to use a remote shutter release to avoid blurring. A common manipulation is to swap the red and blue channels, and reduce the color saturation as shown here:
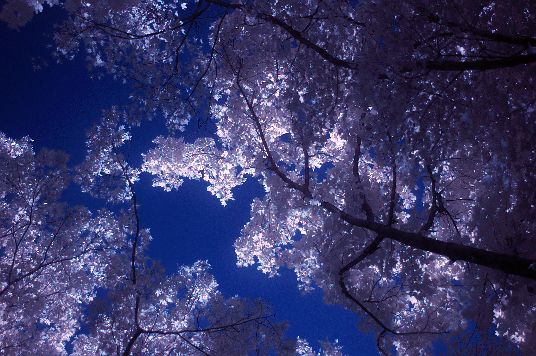
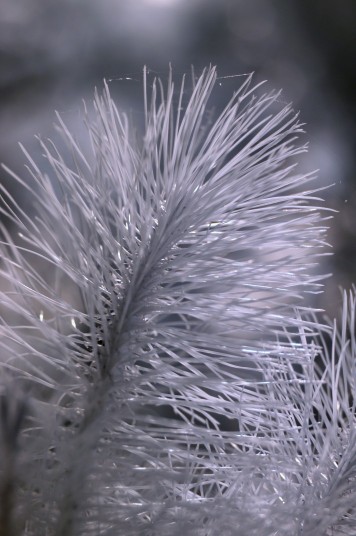
See here for more infrared images taken with a modified DSLR.
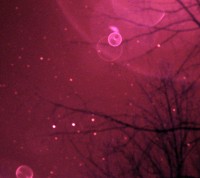
On some cameras, infrared photos are marred by a rectangular (or sometimes circular) reflection or bright spot in the center. This is caused by a reflection of the sensor off the rear of the infrared filter. This is difficult to prevent, because antireflective coatings don't work as well in the infrared as in the visible. Also, although most lenses will pass near-infrared with no problem, some lenses, and some telescopes, are better than others at focusing it to the same point as visible light. For astrophotography, it's often suggested to add a UV/IR blocking filter to avoid chromatic aberration caused by mis-focusing of the longer wavelengths. Just make sure your filter doesn't cut off the critical wavelengths you want to observe.
In fact, though, a UV/IR blocking filter actually has very little benefit for a D90 in astrophotography. That's because it already has a separate UV/IR filter that's stricter than most of the commonly used ones, like Lumicon's. If you want to use a filter, the ideal one to use on a modified DSLR is the Lumicon Deep-Sky Filter. This filter doesn't do much of anything for visual observing, but it produces astonishingly good results when photographing nebulas in a modified DSLR. If you're an amateur astronomer, you know that some of these nebulas are quite big. With a modified camera, this filter, and a place where it doesn't rain every frickin' day, nebulas are not difficult to photograph even if all you have is an ordinary zoom lens.
For astrophotography, a full infrared conversion doesn't help when photographing nebulas. This is because, as mentioned above, removing the IR/color correction filter is already enough to max out the Hα signal. However, there are quite a lot of carbon stars out there, and these will be a lot brighter if you do a full IR conversion.
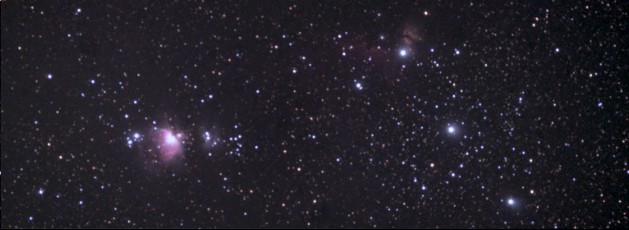
See here for more astrophotographs taken with a modified DSLR.
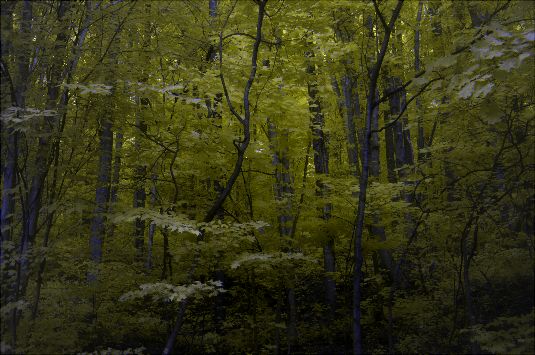
When photographing earthly objects, it is often desirable to combine pictures taken in infrared and visible light. Since it's necessary to take the infrared filter off in order to focus, that's not a problem. Obviously, the viewfinder is not useful when an infrared filter is attached, but Live View works just fine, and autofocus still works with most of the lenses I tested, with the exception of one cheap zoom lens, provided the subject is reasonably bright. Below is a composite image created in Imal using infrared for the red and green channels, and visible light for the blue channel. The tree leaves appear as golden yellow.
Because longer exposures are required, infrared photography of moving objects such as animals and insects can be challenging. A can of Raid can be a valuable tool in studying the wonders of insect life (more or less) in the infrared. For larger animals, such as deer, a bigger photographic accessory may be required. A Jeep Cherokee or Nissan Armada would be ideal. Unfortunately, nature photographs taken with these large photographic accessories often look staged.
In a D90, autofocus works differently depending on whether Live View is on. When Live View is off, the camera uses phase detection sensors below the main sensor. When Live View is on, the camera is in contrast detection mode, which uses the image itself, and ignores whatever is (or is not) in the light path. This means that even if you messed up the focus calibration, the D90 would still be able to autofocus with Live View.
Re-calibrating the autofocus, if it should become necessary, is a very simple procedure that can be done using a small hex wrench without taking the camera apart. The height and angle of the phase detection sensors can be adjusted by three screws accessible under the bottom panel. However, my advice is not to mess with it unless you know what you're doing.
To achieve maximum sensitivity in near-infrared, we have to remove a second infrared-blocking filter. This one does not contain a blue pigment. It's a dichroic coating on a thin piece of glass (43×73×0.72 mm) that the two white piezoelectric elements are attached to. This glass not only blocks UV and IR (primarily by reflecting it), it also serves as a dust filter, keeping dust away from the focal plane where it would create obvious artifacts in your photographs. So it's important to replace it with It is not necessary to remove the second filter in order to do astrophotography or infrared photography. an optical window of the same thickness. That means clipping the four wires leading from the sensor assembly to the piezo elements (see photo above), and installing a clear piece of glass (preferably with an antireflection coating). There is no easy way to remove the coating from the IR filter without ruining the optical surface of the glass. Solvents, with the possible exception of nitric acid or HF, won't touch it. It can be scraped off using a Dremel with a wire brush attachment, but it is hardly worth the trouble. I advise saving it in case you get tired of infrared.
In the D7000, according to some reports, the OLPF is incorporated into the dust filter. This implies that the D7000 uses a totally different design. In contrast, the D90's dust filter is just a single thin layer of glass.
Update Feichen Shen reports that the filters in the D7000 are very similar to those in the D90.
Once you remove this second filter, you'll need to put an UV/IR filter on your camera whenever you use it to take normal pictures. Otherwise those long wavelengths will be so intense they will overwhelm the visible light, causing the colors to be wrong. Since you're using a lens filter, you'll also need a lens hood to prevent lens flare (see photo above).
For astrophotography, it's not necessary to do a complete conversion. Yes, you will lose some of the longer wavelengths, but the second filter doesn't affect the wavelengths (like Hα) used in astrophotography. Even with this second filter in place, you can still can do very good infrared photography and astrophotography. The infrared photos in the sections above were all taken with this second filter in place.
Please note that even a fully-modified DSLR will not be able to do thermal imaging or mid-infrared astronomy. That domain belongs to cooled CCD cameras and exotic cryogenically cooled detectors. The longer the wavelength, the cooler it has to be. However, there are a surprising number of deep red stars out there which emit too little visible light to be detected visually, but are fairly bright in the near-infrared in a modified DSLR.
(Thanks to Feichen Shen for reminding me about this second filter.)
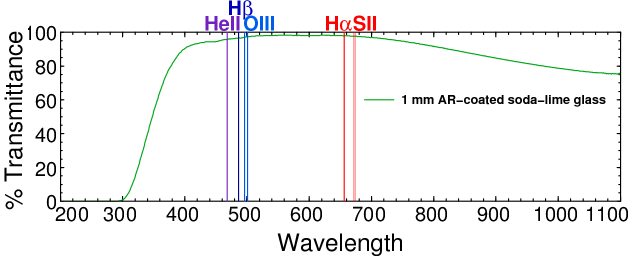
To see what would happen if both filters (the IR/color correction filter and the UV/IR filter) were removed, I removed the the UV/IR filter and the piezoelectric elements from the modified D90 and replaced them with a 1 mm thick piece of AR-coated soda-lime glass (Edmund Optics 48-927), after cutting it to size. Normally, you'd use BK-7 for this, but I didn't have a piece the right thickness lying around. There's no disadvantage to removing the piezoelectric elements; in all the times I've used them, they were never able to remove a single piece of dust as far as I could tell. Below is the UV-Vis spectrum of the new piece of glass. The AR coating helps a great deal, bringing the transmittance up from the 90% that is typical of uncoated glass. However, the anti-reflection coating also has a little absorption in the blue region, which gives the glass a very faint yellow tint.
Technically it's not necessary to replace the dust filter, but you're better off doing so because otherwise dust will eventually land on your low-pass filter, where it causes more of a problem. If I had to do it over, I would have used fused silica instead to let in more UV.
Update: Damion de Soto reports that LifePixel does not replace the dust filter, but cuts their IR-pass filter replacement to optically match both the original hot mirror plus the dust filter. This maintains the same optical path length, preserving the autofocus calibration.
After re-assembling the camera, I reset the white balance and took some photographs of some trees. As expected, the camera's sensitivity had increased dramatically. It was now possible to take infrared photographs without increasing the exposure. The raw, unprocessed infrared photograph appears bright pink instead of orange.
Using a custom white balance, leaving the R72 filter attached, and processing the image in Imal to normalize the three channels, we obtain a usable infrared photo.
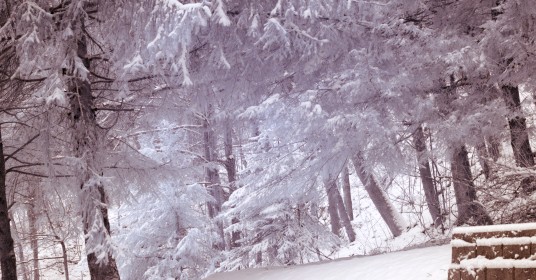
Below is the same scene with the R72 filter replaced by a UV/IR blocking filter, and using a different custom white balance. This is how the scene appears to the naked eye. To take this picture, it was necessary to increase the exposure to 1/25 sec.
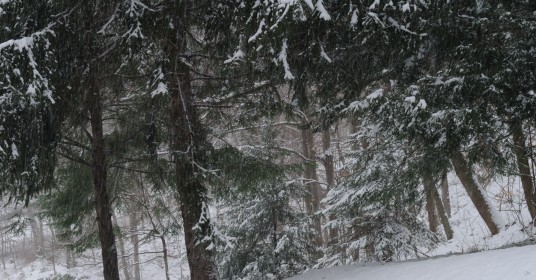
It's clear that if you plan to use the D90 exclusively for infrared photography, removing both filters is the best solution. The camera will be much more sensitive in infrared than a normal D90 is in visible light (at least under incandescent lights or in sunlight—fluorescent lamps give off much less infrared, and will appear darker). The above three photos were all taken using an autofocusing lens, which works just fine with the R72 filter attached.
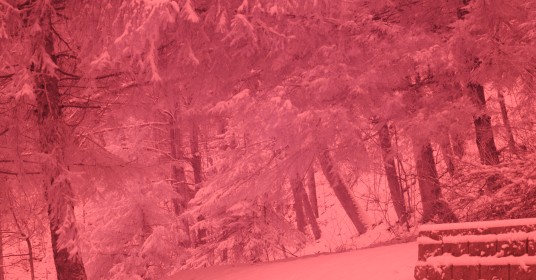
Can a fully-modified D90 be used without a UV/IR filter? The photograph below shows a cropped, unresized portion of images taken on a tripod using a Nikkor 60 mm F/2.8D lens with no filters for the upper image, and a UV/IR blocking filter for the lower one. A different custom white balance was used for each picture to make the background snow appear white. It was also necessary to expose the lower image three times longer to get comparable brightness. With the UV/IR filter removed (top image), we can see there's a problem: too much IR gets through, making the cypress leaves appear brown instead of green. (If the same white balance had been used for both images, it would have been even worse, and the snow would also have appeared red.) No custom white balance or post-processing can fix this in a generally-applicable way.
With this lens, I can't see any difference in the sharpness of the two images. However, when using a Nikkor VR 18-105mm F/3.5-5.6G zoom lens, the unfiltered image was always very slightly blurred. So the ability to focus infrared seems to vary slightly with different lenses from the same manufacturer. In any event, the message is clear: if you remove both IR filters, you'll need to put a UV/IR blocking filter on your lens in order to obtain realistic colors in visible light.
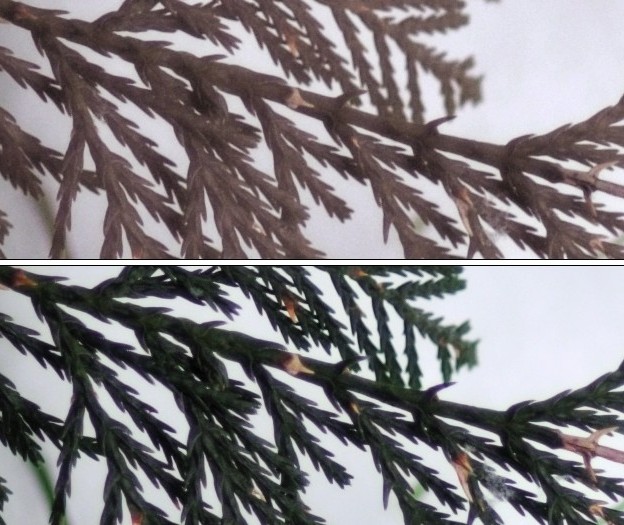
| Lens | Nikkor 60 mm F/2.8D |
| Shutter speed | Top=1/2000s Bottom=1/640s |
| Mode | Manual (using homemade remote) |
| Aperture | F/3.2 |
| ISO | 200 |
| Focal length | 60 mm |
| Focus mode | Manual |
| Distance to target | 4 ft |
| Noise reduc., VR | Off |
| Image size | 4288×2848 (cropped 1.3% area) |
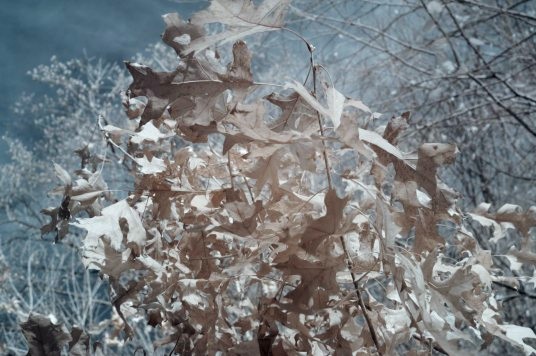
Just in case anyone still doubts that you can still set the white balance after doing a full infrared conversion, below is a picture of some dead oak leaves taken from my back deck after setting a custom white balance using a sheet of white paper. These leaves are reddish-brown in real life (see below under Infrared Movies for an example). As long as some blue gets through, the D90 can still set a white balance. It should be emphasized that these are real colors, not artificial or pseudocolor. So despite what you may read elsewhere on that great truth machine called the Internet, there really is such a thing as "color infrared photography."
Since the contrast in this image is a little washed out and the sky is kind of a murky greenish brown, we can improve it by adjusting the contrast and swapping the red and blue channels (lower image).
Interesting side note: all leaves, whether alive or dead, green, purple, yellow, red, or brown, appear identical in near-infrared. Even flowers, regardless of their color in visible light, are highly reflective and appear white in the infrared. A common misconception is that the white appearance is caused by chlorophyll. In fact, chlorophyll has almost no absorption in the near-IR, and is not in a physical form that could contribute to reflection. Anthocyanins, carotenes, and xanthophylls, which create the beautiful reds, oranges, and yellows, also have little absorption in the near infrared.
How does reflecting near-infrared light benefit the plant? The answer is not known for certain. Leaves are far too thin to receive thermal damage from near-IR light; because they are so thin, they are always in thermal equilibrium with the surrounding air. Computer models suggest that one reason plants are so reflective may be that excess light beyond that which can be utilized by the plant produces oxidative damage.
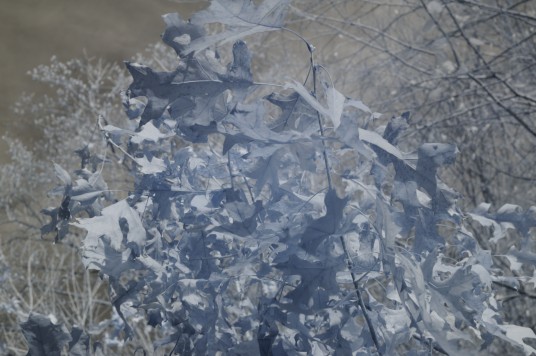
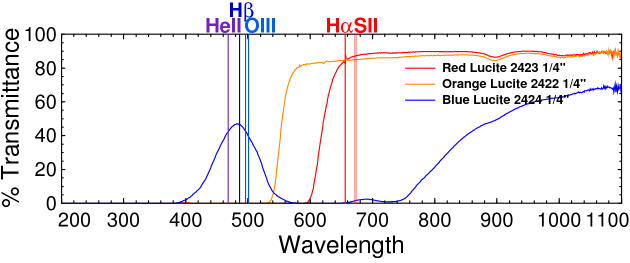
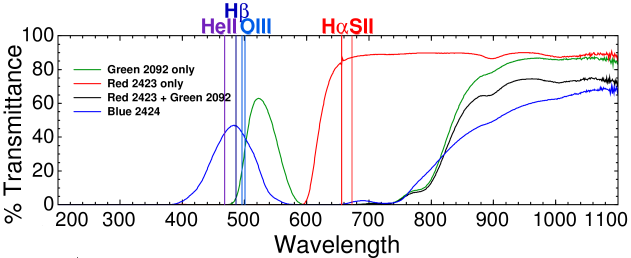
Although not marketed as such, red acrylic (trade name Lucite) #2423 makes an excellent near-infrared filter. Its cutoff is around 600 nm, which means that #2423 acrylic can be used for Hα infrared astrophotography as well. In fact, with a modified camera, 2423 acrylic can give better results for infrared photography for a lot lower cost. With an un-modified camera, it will just make your images look red, and a darker filter such as an R72 is essential.
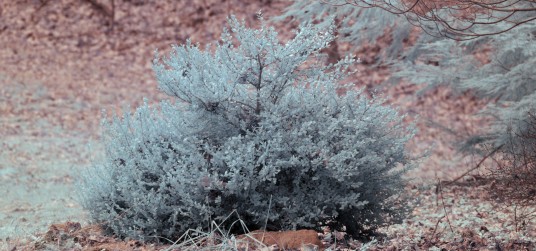
The image below shows that 2423 red passes enough green and blue to make an interesting color effect. In this image the white balance had previously been set manually using an R72 filter. The only manipulation to the image was to maximize the R, G, and B channels in software. The bush comes out sort of a green color. Weird!
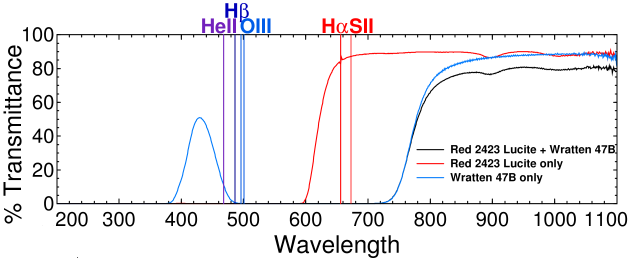
A cheap way of making an excellent IR-pass filter is by combining a red 2423 acrylic and a Wratten #47 or #47B blue filter. Wratten filters are 90% efficient at transmitting near-IR light longer than 760 nm and the red 2423 effectively eliminates the blue passed by the 47B (see spectra below). Images taken with this combination are pure infrared, with no hint of color.
Blue 2424 acrylic isn't much good as an infrared filter. But a the combination of red 2423 and green 2092 makes an even stricter IR filter, effectively blocking most light below about 800 nm (see spectra below). This is getting to the range where water starts to appear dark.
Square filters are cheaper than round ones. They're mounted on the lens using a Cokin P-style filter holder, using an adapter that screws into the filter threads of your lens. The photo below shows a red filter made from ¼-inch acrylic mounted on a D90. The edges of this homemade filter were beveled at a 45° angle to make it fit into the slots, which can hold up to three normal-size filters or two ¼-inch-thick ones.
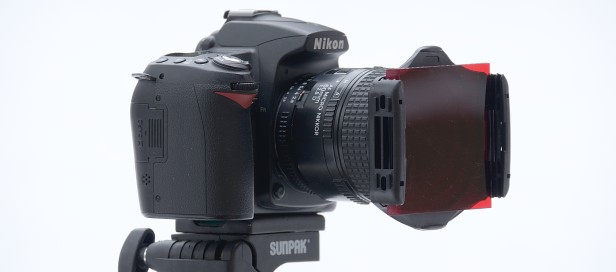
Watch out, though: some square filter holders don't work on big 77mm diameter lenses like the Nikkor 80-200 f/2.8.
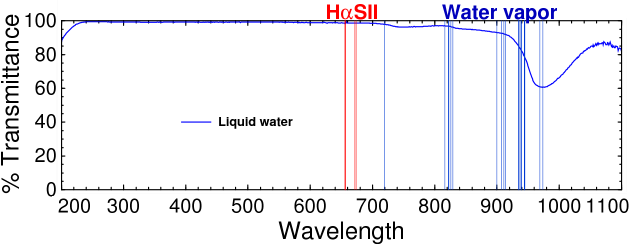
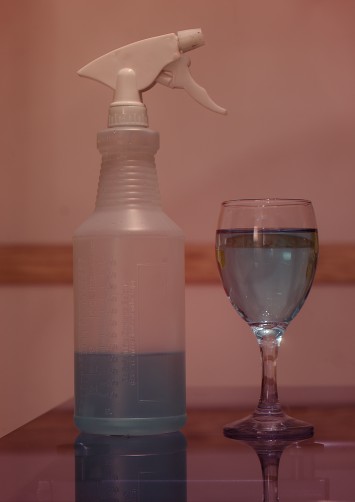
Contrary to what many people might think, water does not appear black in ordinary infrared photographs. However, liquid water has a weak but measurable absorption at 970 nm, and with a narrow-band filter, water does appear black. The absorption from water vapor consists of many sharp lines [1]. These lines are fairly weak in the near-infrared, but can cause problems when measuring stellar spectra.
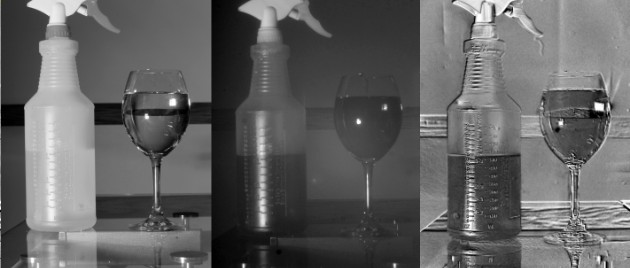
Below is a near-infrared photo of liquid water taken without a filter (left) and with a Kodak 13 Safelight Filter (Cat 179 6705, center). When new, these filters are amber, but they eventually turn black. This filter was quite old and absorbed all light below 940 nm (0.02% T at 590, 0.6% T at 900, 9% T at 1000, and 19% T at 1100 nm). At these wavelengths, the water in the spray bottle and the glass appears opaque (below, center). The glass table is also partially opaque, while the wood rail in the background is more reflective. This safelight filter was not an optical quality filter, so the image appears fuzzy.
A little reflection should convince you that the ideal filter for water is water itself. So in the third panel, I photographed the same scene using a 2.8-cm thick container of water to filter out the water absorption band. I then subtracted a control photo made without the water filter, leaving only the absorbance caused by water. After correcting for the loss of light caused by attenuation in the filter, we obtain a much better picture showing that water really is a colored liquid in the infrared (right panel).
Here are some tips for making water-filtered images:
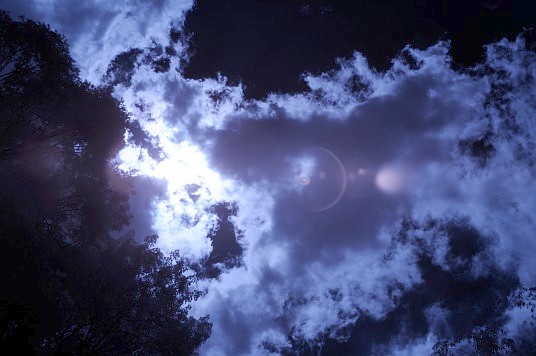
Despite this absorption, clouds are highly reflective and appear white in the near-infrared. At longer wavelengths (especially 2734, 2662, and 6269 nm) clouds would appear dark.
By using a simple grating spectrograph instead of a lens, it's possible to use a modified DSLR as a near-infrared spectrophotometer. Designing a spectrograph is a topic for a future article, but below is a near-infrared spectrum of an incandescent quartz-halogen lamp and a spectrum of a toaster oven taken with a fully modified D90. As the wavelength increases, the color in an unprocessed image changes from orange to pink, indicating that the blue pigment on the sensor also transmits near-infrared light. If the white balance is set using an infrared filter, wavelengths above 850 nm will appear gray.

Below is the halogen lamp spectrum plotted as a graph. The fall-off at longer wavelengths is not caused by the camera, but is typical of all incandescent sources. Once calibrated, the temperature can be calculated from the shape of this curve. The response from silicon sensors falls to zero at around 1100 nm.
A fully-converted D90 can also photograph ultraviolet light down to about 320 or 330 nanometers, depending on the lens. See uv.html for details.
Not surprisingly, modifying a D90 has no effect on its ability to detect ionizing radiation. I was able to pick up one short track from an alpha particle source placed very close to the sensor. Unfortunately, I don't have any intense sources of X-rays, beta-particles, or neutrons lying around at the moment. Exposing a camera to radioactivity is, in general, not good for it and can damage the sensor. Better to leave that sort of thing for your iPhone.
See webcam.html for using a webcam to photograph radioactive particle tracks.
If you plan to make infrared movies, it's recommended to do a full conversion, because movies taken with an R72 filter on a partially modified D90 tend to come out fairly dark, unless you're photographing in full sunlight. One alternative is to use a filter that lets in more visible light, but this would obviously diminish the infrared effect. Movies taken on a fully converted D90 come out sharper and brighter than movies done on a stock D90; however, unless you change the white balance, some post-processing will be necessary to remove the pink tint. As they say in Hollywood, you can always fix it in post.


The images above show that, for a bright outdoor scene, a partial conversion will give a satisfactory result. (Ignore the orange tint: to ensure a fair comparison, the same white balance was used for all three images). In all my test movies, the fully converted D90 gave the brightest and cleanest outdoor movies. Some of the movies taken in the early morning (not shown) were also very dark with the partially converted D90.
For indoor scenes, the difference is much greater. Movies made with the partially converted D90 were always too dark to see, unless the camera was pointed at a window. The only way to obtain a good infrared movie was by opening the aperture to f/2 or wider. So you would need a floodlight or a very fast lens to take movies indoors with a partially converted D90.
Some earlier Nikons can also be converted to infrared. Converting a D80, which has a CCD sensor, is about the same as the D90, maybe even a little easier. However, the D80 does not have Live View, so autofocus would be lost and even manual focusing would become a challenge. A D200 is a much nicer camera than a D80. Disassembling a D200, however, is more difficult. It's necessary to remove the rubber grips, de-solder the shield, and pry off the bottom panel to get to the sensor. You have to worry about small gray wires, and some of the ribbon cables are more difficult to re-attach. Not recommended.
Update (Mar 31, 2015) Nikon has a new DSLR designed for astrophotography called the D810A. It has a special IR-cut filter that makes its spectral response comparable to a partially modified D90—but it has 36.3 megapixels instead of 12, and you can expose for up to 15 minutes. A D810A can photograph nebulas without modification, but you'd still need to modify it to do infrared photography.
Nikon still makes things tough for astrophotographers. They don't make a remote timer remote control for the D90 (the other non-Nikon timers are mostly junk). They charge extra for software that can read their NEF format images. But there's no doubt that their camera can be modified for infrared just as easily as a Canon. Optically and electronically, the modified D90 is an excellent camera for astrophotography. The moral is: don't believe any camera comparisons you may read unless they're backed up with solid scientific data.
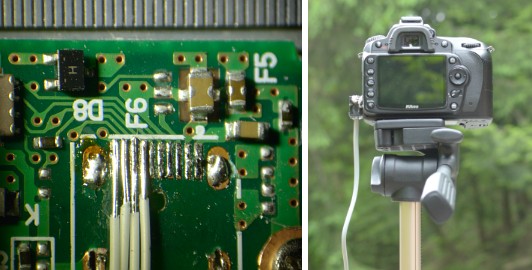
The Nikon remote shutter release uses a very small D-sub connector which is surface-mounted on a small circuit board. This connector is very flimsy and fell out on my D90, so I replaced it with a modular 6P6C RJ45-style connector.
The small circuit board can be easily removed without touching the main circuit board. Remove the back cover (including the LED screen) and the left panel, loosening the two screws on the front of the camera if necessary to get the side panel out. Remove the small circuit board and solder four pieces of 30-gauge wire to it. Only the first four contacts are actually necessary. Add a drop of hot-melt glue to prevent the wires from being pulled out.
There isn't enough space inside to mount the modular connector unless you remove the big capacitor (which is presumably for the flash, which is generally not of much use in astrophotography). To mount the connector on the outside, use a Dremel or small file to create a flat area on the left panel, then epoxy the modular connector such that the opening faces down.
Mount a second modular connector in a small box and add some switches. You will need a 4PST momentary contact switch wired so that all four contacts are connected to each other when the switch is pressed. Pressing the switch causes the D90 to autofocus if AF is active, and then releases the shutter. I used two switches in parallel. The second switch is a push-to-hold switch that locks the D90 in continuous shooting mode.
This setup is much more convenient than the standard MC-DC2, which uses a cheap button that is hard to find when you're in a hurry (or when it's dark). The improved design lets you use an ordinary 4-conductor telephone cord, which can be as long or as short as needed and can be easily replaced. A 50-foot phone cord lets you use the D90 to photograph wildlife as well.
Image quality in the D90 is greatly improved when imaging in cold weather, especially around 0°C. At lower temperatures, condensation and ice formation on the optics and light from the surrounding snow are a problem. It would be nice to add a Peltier cooler to the sensor.
A person named Anat Ruangrassamee added a Peltier cooler to a Canon 450D. In the 450D, there is a 1.35 mm gap between the sensor and the circuit board, which makes it easy to add an aluminum or copper plate to conduct heat to an outboard Peltier device. To prevent condensation, he had to fill the entire space with hot-melt glue.
One disadvantage is that CMOS sensors supposedly have more read noise than CCD sensors, which limits the benefits of cooling. Better results might be obtained cooling older Nikons which used CCD chips.
Adding a Peltier is much more difficult in a D90, because leads from the circuit board are soldered to the sensor on all four sides. Simply cutting the leads on one side and bypassing the connection by using long wires would be a bad idea, because digital circuit boards often require precise timing to function properly. A better solution would be to cut the leads on all four sides and raise the board by 3-4 mm, rerouting the leads so that a small Peltier and some mini-heat pipes can be added directly to the back of the sensor chip. This would have a couple of advantages:
Heat pipes can be made easily by putting a wick inside some thin copper tubing, adding a small amount of acetone, heating it to a boil for a few seconds to displace the air, then sealing the ends. Even better would be rectangular heat pipes. The disadvantage is that you'd probably also have to raise the main circuit board and the LED screen to create enough space.
The biggest problem is: once you start modifying a D90, it is hard to stop. Why not add a hinge to give it an articulating screen ... add a phosphor screen so you can photograph X-rays ... put Linux on it ....
[1]. Guzzi R Rizzi R Water vapor absorption in the visible and near infrared:
results of field measurements Appl Optics 23, 1853 (1984)
[2]. Smith, WJ Modern Optical Engineering, 4th ed. p 293
[3]. Segelstein, D. (1981) The Complex Refractive Index of Water, M.S. Thesis,
University of Missouri Kansas City, cited at
http://www.philiplaven.com/p20.html,
data at http://www.philiplaven.com/Segelstein.txt
